Playing the Game
- Build a Blockade
To prevent the escape of the opponent's checkers from your home board, try placing your checkers without gaps directly in front of the opponent's checkers, blockading them. If you build a 'prime' blockade - six no-gaps checkers in a row -- that would make it impossible for the opponent's checkers to escape.
- Establish Anchors
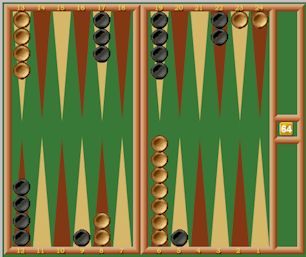
Try establishing defensive points (anchors) in the opponent's home board. This serves two purposes: (1) provides for a landing spot should you get hit (2) does not let your opponent to make his home board. Bar-adjacent points (20, 21) are the most valuable to occupy early in the game. If you get behind in the race, points father away from the bar (22, 23, 24) become more valuable to occupy. It is best to establish adjacent anchors. You may consider intentionally allowing your blots (uncovered checkers) to be hit so that you can establish anchors, gain time and preserve other advantages of your position.
- Optimize Distribution of Checkers
Try distributing your checkers more evenly across the board. There is rarely any need to have six or more checkers on a single point. A player with uneven checker distribution will have less flexibility to use rolls to his advantage. Try spreading your checkers in order to increase the number of 'good' rolls on the next turn. In addition, try keeping your checkers within six pips of each other: this will help in case any checker needs to be covered.
- Reduce 'Good' Rolls for the Opponent
Try placing your checkers such that two of the opponent's desired moves in different parts of the board both require the same die value. For example, if you must leave two exposed points, try placing them the same distance away from potential attackers. If opponent needs a certain die value to get off the bar, try placing your exposed checkers that value of the die away from potential attackers.
- Know When to Expose Checkers vs. When to Consolidate Them
Early in the game, you can try leaving exposed checkers so they can be used as stepping stones to establish a strong offense or defense. Later on in the game and (especially if your position is weaker) consolidating your checkers is the best strategy.
- Decide When to Hit or not to Hit
It is usually more valuable to hit the most advanced of enemy checkers.
However, try hitting your opponent's checkers only when it is advantageous to do so. For example, try to hit checkers that your opponent would like to cover later for establishing an important point. Consider NOT hitting if your opponent already has checkers on the bar and you can establish another valuable point if you do not hit. If you decide to hit, try to cover -- in view of a possibility of a return hit.
|
| Throws | Best Ways of Playing Opening Rolls
|
|
6 and 6
|
A strong starting throw. Move 2 checkers to close your opponent's Bar point and your own Bar point -- 24/18(2), 3/7(2)
|
|
5 and 5
|
A weak starting throw. Move 2 checkers from your opponent's 12 point to your 3 point -- 13/3(2)
|
|
4 and 4
|
Move 2 checkers from your opponent's 1 point to opponent's 5 point and 2 checkers from your opponent's 12 point to your 9 point -- 24/20(2), 13/9(2)
|
|
3 and 3
|
Move 2 checkers from your opponent's 1 point to opponent's 4 point and 2 checkers from your 8 point to to your 5 point -- 24/21(2), 8/5(2)
|
|
2 and 2
|
Move 2 checkers from your opponent's 1 point to opponent's 5 point -- 24/20(2)
|
|
1 and 1
|
The best starting throw. Move 2 checkers from your 8 point to your Bar point and 2 checkers from your 6 point to your 5 point -- 8/7(2), 6/5(2)
|
|
6 and 5
|
Move a checker from your opponent's 1 point to opponent's 12 point -- 24/12
|
|
6 and 4
|
Move one checker from your opponent's 1 point to opponent's bar point -- 24/18. Move another checker from opponent's 1 point to opponent's 5 point --24/20
|
|
6 and 3
|
Move two checkers from your opponent's 1 point to opponent's bar and 4 point --24/18, 24/21
|
|
6 and 2
|
Move two checkers from your opponent's 1 point to opponent's bar and 3 point --24/18, 24/22
|
|
6 and 1
|
Move one checker from your opponent's 12 point to your bar point and one checker from your 8 to your 7 (bar) point --13/7, 8/7
|
|
5 and 4
|
Move one checker from your opponent's 1 point to opponent's 5 point and one checker from opponent's 12 to your 8 point --24/20, 13/9
|
|
5 and 3
|
Move one checker from your opponent's 12 point to your 8 point and one checker from opponent's 12 to your 10 point --13/8, 13/10
|
|
5 and 2
|
Move one checker from your opponent's 12 point to your 8 point and one checker from opponent's 12 to your 11 point --13/8, 13/11
|
|
5 and 1
|
Move one checker from your opponent's 1 point to opponent's bar point --24/23, 23/18
|
|
4 and 3
|
Move one checker from your opponent's 1 point to opponent's 4 point and one checker from opponent's 1 to opponent's 5 point --24/20, 24/21
|
|
4 and 2
|
Make your 4 point --8/4, 6/4
|
|
4 and 1
|
Move your checker from opponent's 1 point to opponent's 2 point and one checker from opponent's 12 point to your 9 point --24/23, 13/9
|
|
3 and 2
|
Move your checker from opponent's 1 point to opponent's 3 point and one checker from opponent's 12 point to your 10 point --24/21, 13/11
|
|
3 and 1
|
Make your 5 point --8/5, 6/5
|
|
2 and 1
|
The worst possible throw of the dice. Move your checker from opponent's 1 point to opponent's 4 point -- 24/23, 23/21
|

